
Quite possibly, tonight’s dessert will feature in the dreams of my children. I can almost guarantee that it will feature in mine! Continue reading
Quite possibly, tonight’s dessert will feature in the dreams of my children. I can almost guarantee that it will feature in mine! Continue reading

A quick little recipe post for my lovely Mum, who I think was worrying that I was worrying too much about the health issues of the world this week. An effortless yoghurt and orange cake to welcome the weekend and to wish you all much happiness (and hopefully a little sunshine to enjoy) over the next few days. Solving the obesity epidemic can wait ’til next week! 😉
Pre-heat the oven to 180°C. Grease and line the base of a 22cm round cake tin.
Cream the butter, sugar and orange zest in an electric mixer until light and fluffy. Add the eggs one at a time and mix until combined.
In a measuring jug, mix together the yoghurt and orange juice.
In a separate bowl, sift together the flour, baking powder and salt.
Add the dry ingredients in 2 or 3 lots to the butter mixture, alternating with the yoghurt/juice. Mix each addition through gently, until completely combined.
Scoop the mixture into the cake tin and bake for approximately 45 minutes, or until a skewer comes out clean.
Allow cake to cool for 10 minutes, before turning out of the tin. When cool, dust with icing sugar or decorate as you wish.


How lovely to have a dish named after you. What an honour! The Victoria Sponge… Pavlova… Sacher Torte… Peach Melba… Tarte Tatin… Pizza Margherita… Beef Wellington… Beef Stroganoff… Beef Carpaccio… to name but a few – all created to pay homage to a deserving individual or otherwise named to provide lasting fame for the genius who concocted the special dish.
On a cold winter’s night, is there anything better than indulging in a hot pudding for dessert! My thanks go to Elizabeth – whether she be Queen, grandmother, daughter, friend or other fine, charismatic woman for inspiring or creating this delicious, heart-warming dessert! Another little find from within the ‘Green and Gold Cookery Book’. Such a deep sense of pleasure, drumming up recipes from the past, so that they don’t slip away into oblivion.
Pre-heat the oven to 180°C. Grease a 5-6 cup-capacity deep baking dish with butter and sprinkle a little sugar over the base.
Slice the apples into quarters and then slice each quarter into three. Line the base of the baking dish with the apple slices.

Into a large mixing bowl, place the flour, sugar, salt and cinnamon. Whisk to remove any lumps. Add the milk, egg and melted butter and continue whisking until smooth and completely incorporated. Gently pour the thick batter over the top of the apples.
Bake for approximately 45 minutes or until the top springs back when gently pressed in the centre. Before serving, invert the pudding onto a plate, so that the apples are on top. Sprinkle lightly with a little extra cinnamon if you wish…
Serve hot, slathered with your choice of cream, custard or ice-cream.


A few weeks ago when my children and I were unwell, I went searching for the ultimate in health-promoting, comforting and most importantly… delicious-tasting soups. It was a given that it had to be based around chicken, but when I came across this rather lovely recipe featuring leeks, garlic, lemon and a little pasta, I knew that I’d found exactly what I was looking for! It is a recipe that I’ve adapted (ever so slightly) from one of my favourite Neil Perry cookbooks, called ‘The Food I Love’.
I’m absolutely kicking myself that I didn’t discover this soup years ago… all those years that have passed when we could have been indulging and restoring ourselves through the colder months of the year. Therefore, starting immediately is our belated, but now completely embraced tradition of chicken soup to warm the body and soul.
The first two steps of this recipe can be done well ahead of time if you like and then placed in the fridge until you’re ready to start cooking the leeks/garlic.
Fill a medium-sized saucepan with water and add the peppercorns, star anise, bay leaf (or any other herbs, spices or aromatics that you desire). Bring to the boil and then turn off the heat completely. Place your chicken breast(s) into the pot with the poaching liquid and leave for about 2 hours. Remove to a bowl to cool, before shredding.
While the chicken is poaching, place a small saucepan filled with water on the stove and once again, bring to a rolling boil. Add some sea salt and then the orzo pasta, giving a quick stir to make sure none is stuck together and then cook until al dente (tender, but with a slight bite). When ready, drain the orzo and rinse gently with cold water. Set aside for later.
About half an hour before you want to serve dinner, place a large saucepan over medium heat. Add the olive oil, along with the chopped leeks, garlic and a little sea salt. Allow to sweat for about 10 minutes or so, until the leek has softened. Then add the chicken stock, lemon zest and juice (depending on the size and type of lemon, you may wish to add half of the juice at first and then taste to see if more is required) and simmer for another 10 minutes.
At this point it’s up to you to decide whether to puree the soup or not. With one of my children averse to the sight of cooked vegetables in any soups or stews, I decided that a couple of minutes of whizzing the soup with a stick blender was the only way that he might enjoy it. It worked!
Now add the shredded chicken and orzo into the soup and stir gently to combine. When the chicken and orzo are warmed through, the soup is ready to serve.
This soup is lovely as it is, or perfect with some finely-grated parmesan cheese and some chopped flat-leaf parsley scattered on top… with some crusty bread on the side too!


On nights like tonight, after baking batches of muffins and cookies for children’s end of term parties at school tomorrow, a quick, easy pasta dish for dinner was all I had time for. I love that this recipe is cooked in the time it takes to boil the water and cook the pasta. It’s always a hit with the kids, especially when served with a little garlic bread on the side!
There are so many fabulous variations of Pasta Carbonara out there, but I still felt keen to document and share this particular version – it’s the one we’ve been cooking for years now and we still haven’t tired of it.
A quick post for a quick pasta!
Place a large pot of water on the stove and bring to a rolling boil. In a book I’m currently reading, ‘In Search of Total Perfection’, Heston Blumenthal recommends about 1 litre of water for every 100g of pasta.
While the water is coming to the boil, place the egg yolks, cream, parmesan, nutmeg and seasonings into a small mixing bowl and stir well to combine. Set this bowl aside for later on.
Once the water is boiling, add some salt (another Heston tip: add 10g of salt for every 100g of pasta) and give a quick stir before throwing in the pasta. Stir again gently to make sure none of the pasta is sticking together.
In a medium-sized frying pan over med-high heat, pour in the olive oil and when hot, add the speck. Fry until nice and golden. Turn the heat down a little and add the white wine, stirring to lift any little bits of speck stuck to the bottom of the pan. Allow the wine to simmer for a few minutes until syrupy and then turn off the heat.
Keep an eye on the pasta and strain it in a colander as soon as ‘al dente’ (tender, but with a slight bite). Add the drained pasta directly into the frying pan and toss briefly in the oil and speck until all of the pasta is coated. Remove the pan from the stove (so that the sauce doesn’t curdle from the eggs coming in to contact with too much heat) and stir in the egg/cream mixture. The sauce will thicken slightly with this gentle stirring. Check for seasoning and adjust if necessary. Serve immediately.

The last few weeks have primarily been spent nursing children (and myself…) back to health from the coughs and colds that winter invariably brings. Days spent juicing oranges, reading books, cooking comfort food and playing the occasional quiet board game… fine for a day or two, but let’s just say I’m thankful that children are now back at school and that life can finally drift back to normality. Drafts for three different posts I’d hoped to share with you, sit half-written from this period. All seemed a little flat and lacklustre (exactly as I was feeling) in both the writing and photos, so when time permits I’ll attempt to spice them up with some new, improved photos and a touch of editing, before sending them out. A winter-warming soup and a beautifully fragrant casserole were amongst the three, so it really won’t be much of a hardship to cook them over again…
During this time, I’ve also had a little fun playing around with my favourite choc-chip cookie recipe, adding various combinations of spices, cocoa, coffee and chocolate. This was much to the delight of my super-keen taste-testers who probably couldn’t taste a thing with their blocked noses, but loved the fact that we were experimenting all the same! A home economics, food appreciation and science lesson packed into one… Some batches were a little over the top in my enthusiasm for packing a punch of flavour, so when the following cookies came out of the oven, I was very relieved that the flavours I wanted were there, but with a touch more grace and subtlety.
Pre-heat the oven to 180°C. Line 2 baking trays with parchment/baking paper.
Melt the butter in a small saucepan, over gentle heat. Once melted, remove from the heat and tip into a large mixing bowl, along with the sugar and mix well with a wooden spoon. Add the egg and vanilla extract and once again, mix well. Sift in the flour, baking powder, Chinese Five Spice, coffee and salt and stir until combined. Add in the chopped chocolate and mix gently.
Onto the baking trays, scoop teaspoonfuls of the mixture, leaving a little space around each. Bake for about 10 minutes for a crispy texture, or a minute or two less if you prefer soft.
Remove to a cooling rack for at least a couple of minutes, before tasting…


For a little while there, it was like having a third child… I gazed upon it, protected it, nurtured it and when it was fully grown and ready, I eased it out gently into the real world. Surely, there has been no other cumquat as well-loved and as well-photographed as this one here. You can more than likely tell that we don’t have many other fruit trees supplying us with nature’s bounty.
So, what did I end up doing with my one little cumquat? After requesting (and gratefully receiving… thanks girls!) advice on my previous post, thumbing through cookbooks and perusing numerous online images and recipes, a decision was finally made. Candied Cumquat was the unanimous consensus. A dear friend of mine mused that dark chocolate would be the perfect base… and as much as I knew that the flavours would work brilliantly together, I was unsure of the visual aspect in placing caramel-coloured candied cumquat atop the darkest of chocolate. I was picturing brown upon brown and felt that the cumquat might get a little lost. Lemon or orange syrup cake had entered my mind, but no amount of searching for attractive images online could confirm that this idea would create the beautiful result I was after. I searched and searched, but was surprisingly nonplussed by all that I came across.
In the end, flavour took priority and I decided on making some ‘Pots de Crème au Chocolat’ with a spot of cream to both highlight the cumquat and cut through the richness of the chocolate. I particularly thought to use a mixture of milk and dark chocolate in the Crèmes, to soften the flavour somewhat for my children’s palates… others may choose to work with purely dark.
I have a little confession to make though my friends… I have come to comprehend why our cumquat tree has hesitated in producing fruit for us before. It’s now really quite clear! Our family… all four of us it seems… DON’T actually like cumquats! Their appearance – yes! – by all means, what could be better than a fruiting ornamental cumquat to sit and admire? The candied cumquat that I made was all too reminiscent of the cloyingly tart marmalades I’ve tasted in the past. I ate it, but regret to say that it wasn’t altogether enjoyable. My youngest child passed his nibbled-at slice of cumquat to me, to finish on his behalf, while the others chewed furiously fast, just to make the taste go away… Thankfully the dessert sitting underneath was there and waiting. Within a moment the decadent taste of chocolate had wiped away the bitter ending to our prized cumquat.
This really wasn’t the outcome I’d hoped to be sharing with you today, but unfortunately it is the simple and honest truth. If we are graced by any more cumquats in the future, I will certainly try to find another way of enjoying them through cooking, in a savoury dish next time… like a tagine perhaps. Or maybe even amongst a salad…
The Pots de Crème au Chocolat that I prepared are adapted slightly from a recipe I found, by The Plantation House Restaurant in Hawaii (which looks an idyllic location!). Being way too generous and enthusiastic in my portion sizes of these, I’ll know now for future reference, that this quantity will provide dessert for six to eight people, instead of a greedy four. They are lusciously creamy in texture, rich in chocolatey goodness and go beautifully with a scoop of chantilly cream on top. An adornment of fruit is still I think required, though depending on what’s in season, perhaps the likes of raspberries (or any berry for that matter), kiwi or banana. A sprinkling of chopped toasted nuts would also be fabulous…

For the Pots de Crème:
Gently melt the two types of chocolate over a double boiler. At the same time, warm up the cream in a saucepan, until it almost comes to a boil (do not let it boil). Add the sugar and heated cream to the chocolate, stirring carefully until smooth. Whisk the egg yolks in a separate bowl, then add a spoonful of the chocolate mixture and whisk to combine (this will hopefully help to avoid having scrambled eggs in the next stage!) Now add the egg yolks, vanilla extract and salt to the chocolate and again stir carefully until silky and smooth. If you feel at all that your mixture is a little lumpy, strain it through a sieve before it cools down.
Allow to cool a little before pouring into your chosen pots/glasses/ramekins. Refrigerate for about 3 hours, before serving with whipped (Chantilly) cream and a slice of candied cumquat.
For the Candied Cumquat: 
In a small saucepan, stir the water, sugar and star anise (if using) over medium heat until it comes to a gentle boil, allow the syrup to simmer for a minute or two. Slice the cumquats thinly and add them to the syrup. Simmer for about 10 minutes, stirring gently every now and then.

Remove cumquat slices (and a little of the syrup) to a bowl to cool down, ready to garnish the Pots de Crèmes…


What to do… when your cumquat tree decides to bear just one, solitary cumquat? I wouldn’t be asking this question if it wasn’t the most beautiful cumquat I’d ever seen and as it’s the only cumquat my tree has ever deigned to produce, it truly deserves to be celebrated! My little citrus gem is ready to be plucked from it’s branch in the next day or two, before the birds discover my hidden treasure, so your thoughts and advice on how to best savour and venerate this lone piece of fruit would be ever so welcomed! I get the feeling jam is out of the question…

From cumquats to cupcakes… Both, worthy of celebration and each so endearing in their miniature sizing. Though, unlike the cumquat, I’ve had a glut of cupcakes practically spilling out of the oven over the past few days as the Birthday celebrations of our eldest took place. Two dozen decorated cupcakes to share with classmates at school and then another dozen or so (slightly more dressed-up) for party day!
It was perfect timing that I’d done a ‘Cupcake Decorating’ course with a few girlfriends just recently, so unlike the many years gone by, I was now well-taught (though not terribly well-practised) in the techniques of frosting with a piping bag. It was so much speedier (and I must say, a little more elegant…) than slathering them with a palette knife! In our course, we also spent time decorating with fondant icing – forming piggy faces, roses, ribbons/bows and somewhat creepy-looking babies (well, mine was anyway!) A lesson of basic tips and tricks that will be fabulous to know for the family Birthday cakes yet to come. A few Photos…
There really is something indulgent and slightly magical in the eating of these miniature cakes, that can transport you back to childhood in an instant. Something decadent in being able to consume a whole cake, in it’s entirety, in a matter of seconds… without feeling too guilty. The flavours, colours and designs are limited only by your imagination.
Enjoy the following classic recipe for Vanilla Sundae Cupcakes with vanilla frosting, which are then made even more delicious with a topping of melted chocolate and a little crunch from coloured sprinkles. My children loved them… and I must admit, so did I!
Pre-heat the oven to 180°C and place paper baking cups onto a tray.
In an electric mixer, cream the softened butter and sugar together until light and fluffy. Add the vanilla extract and the eggs, one at a time, beating well after each addition. Beat in the sifted flour and salt, in two lots, alternating with the milk until combined. Spoon the batter into the paper baking cups and bake for approximately 15 – 25 minutes (depending on the size of your cupcakes), or until a skewer comes out clean from the centre of your cupcakes.
Allow to cool completely before decorating. The recipe for frosting and tips for decorating are to follow…


Place all ingredients into an electric mixer and beat, initially on slow speed (until the icing sugar has been incorporated into the butter), then on medium/fast until frosting is fluffy.
Using a Wilton 1M Piping Tip (or similar) and a piping bag, pipe swirls over each of your cupcakes, working from the outside in.

To transform into ‘Vanilla Sundae Cupcakes’… drizzle carefully with melted chocolate (I used 100g of good quality Milk Chocolate mixed with 1 Tablespoon of Vegetable Oil – heated gently and stirred over a double-boiler… or extra-carefully in short bursts in the microwave). Top each cupcake with a lolly/candy raspberry (or a glacé cherry for authenticity) and scatter with some coloured sprinkles.


A completely unexpected delight which has stemmed from creating this little blog has been opening up my ‘WordPress Reader’ each morning to discover what my newly-found blogging friends from around the world have been creating in their own kitchens. Their musings, recipes and photos are at once delicious and provide more inspiration and encouragement than they can possibly imagine. For this, I thank you all dearly! You so frequently bring a smile to my face, illuminate light bulbs in my mind and bring calm to my heart in the knowledge that I’m not alone in this passion for all things food related. It’s like discovering a family out there, that I never new I had! Continue reading

For years I avoided any recipe that involved the making of choux pastry. It always seemed like it had ‘catastrophe’ written all over it. Eclairs and profiteroles were to be enjoyed fresh from authentic French patisseries… Continue reading

It was with something of a heavy heart that I went out to pick the last remaining tomatoes from the garden this morning. They have provided us with such beautiful and bountiful fruit right the way through summer and autumn, however the time has finally come to clear the beds and tidy up before winter hits… and from the forecast I’ve just seen, it appears that winter will rear it’s frosty head tomorrow. Give me a day or two and I promise that my melancholic mood will give way to much eagerness for all the delicious soups, roasts, casseroles and heart-warming puddings yet to come… however today shall be dedicated purely to the tomato.
Back in very late October I nestled our six little tomato seedlings into their rather large pots and commenced tending to them as if they were my own children. Often questioning whether they were hungry or thirsty, getting enough warmth and light from the sun and making sure their ever-growing limbs were supported and nurtured in the right directions. Our season hopefuls included two Romas, two Cherries, a Green Zebra and a Black Russian – an attractive mix of colours, sizes and flavours to adorn the salad bowls of summer.
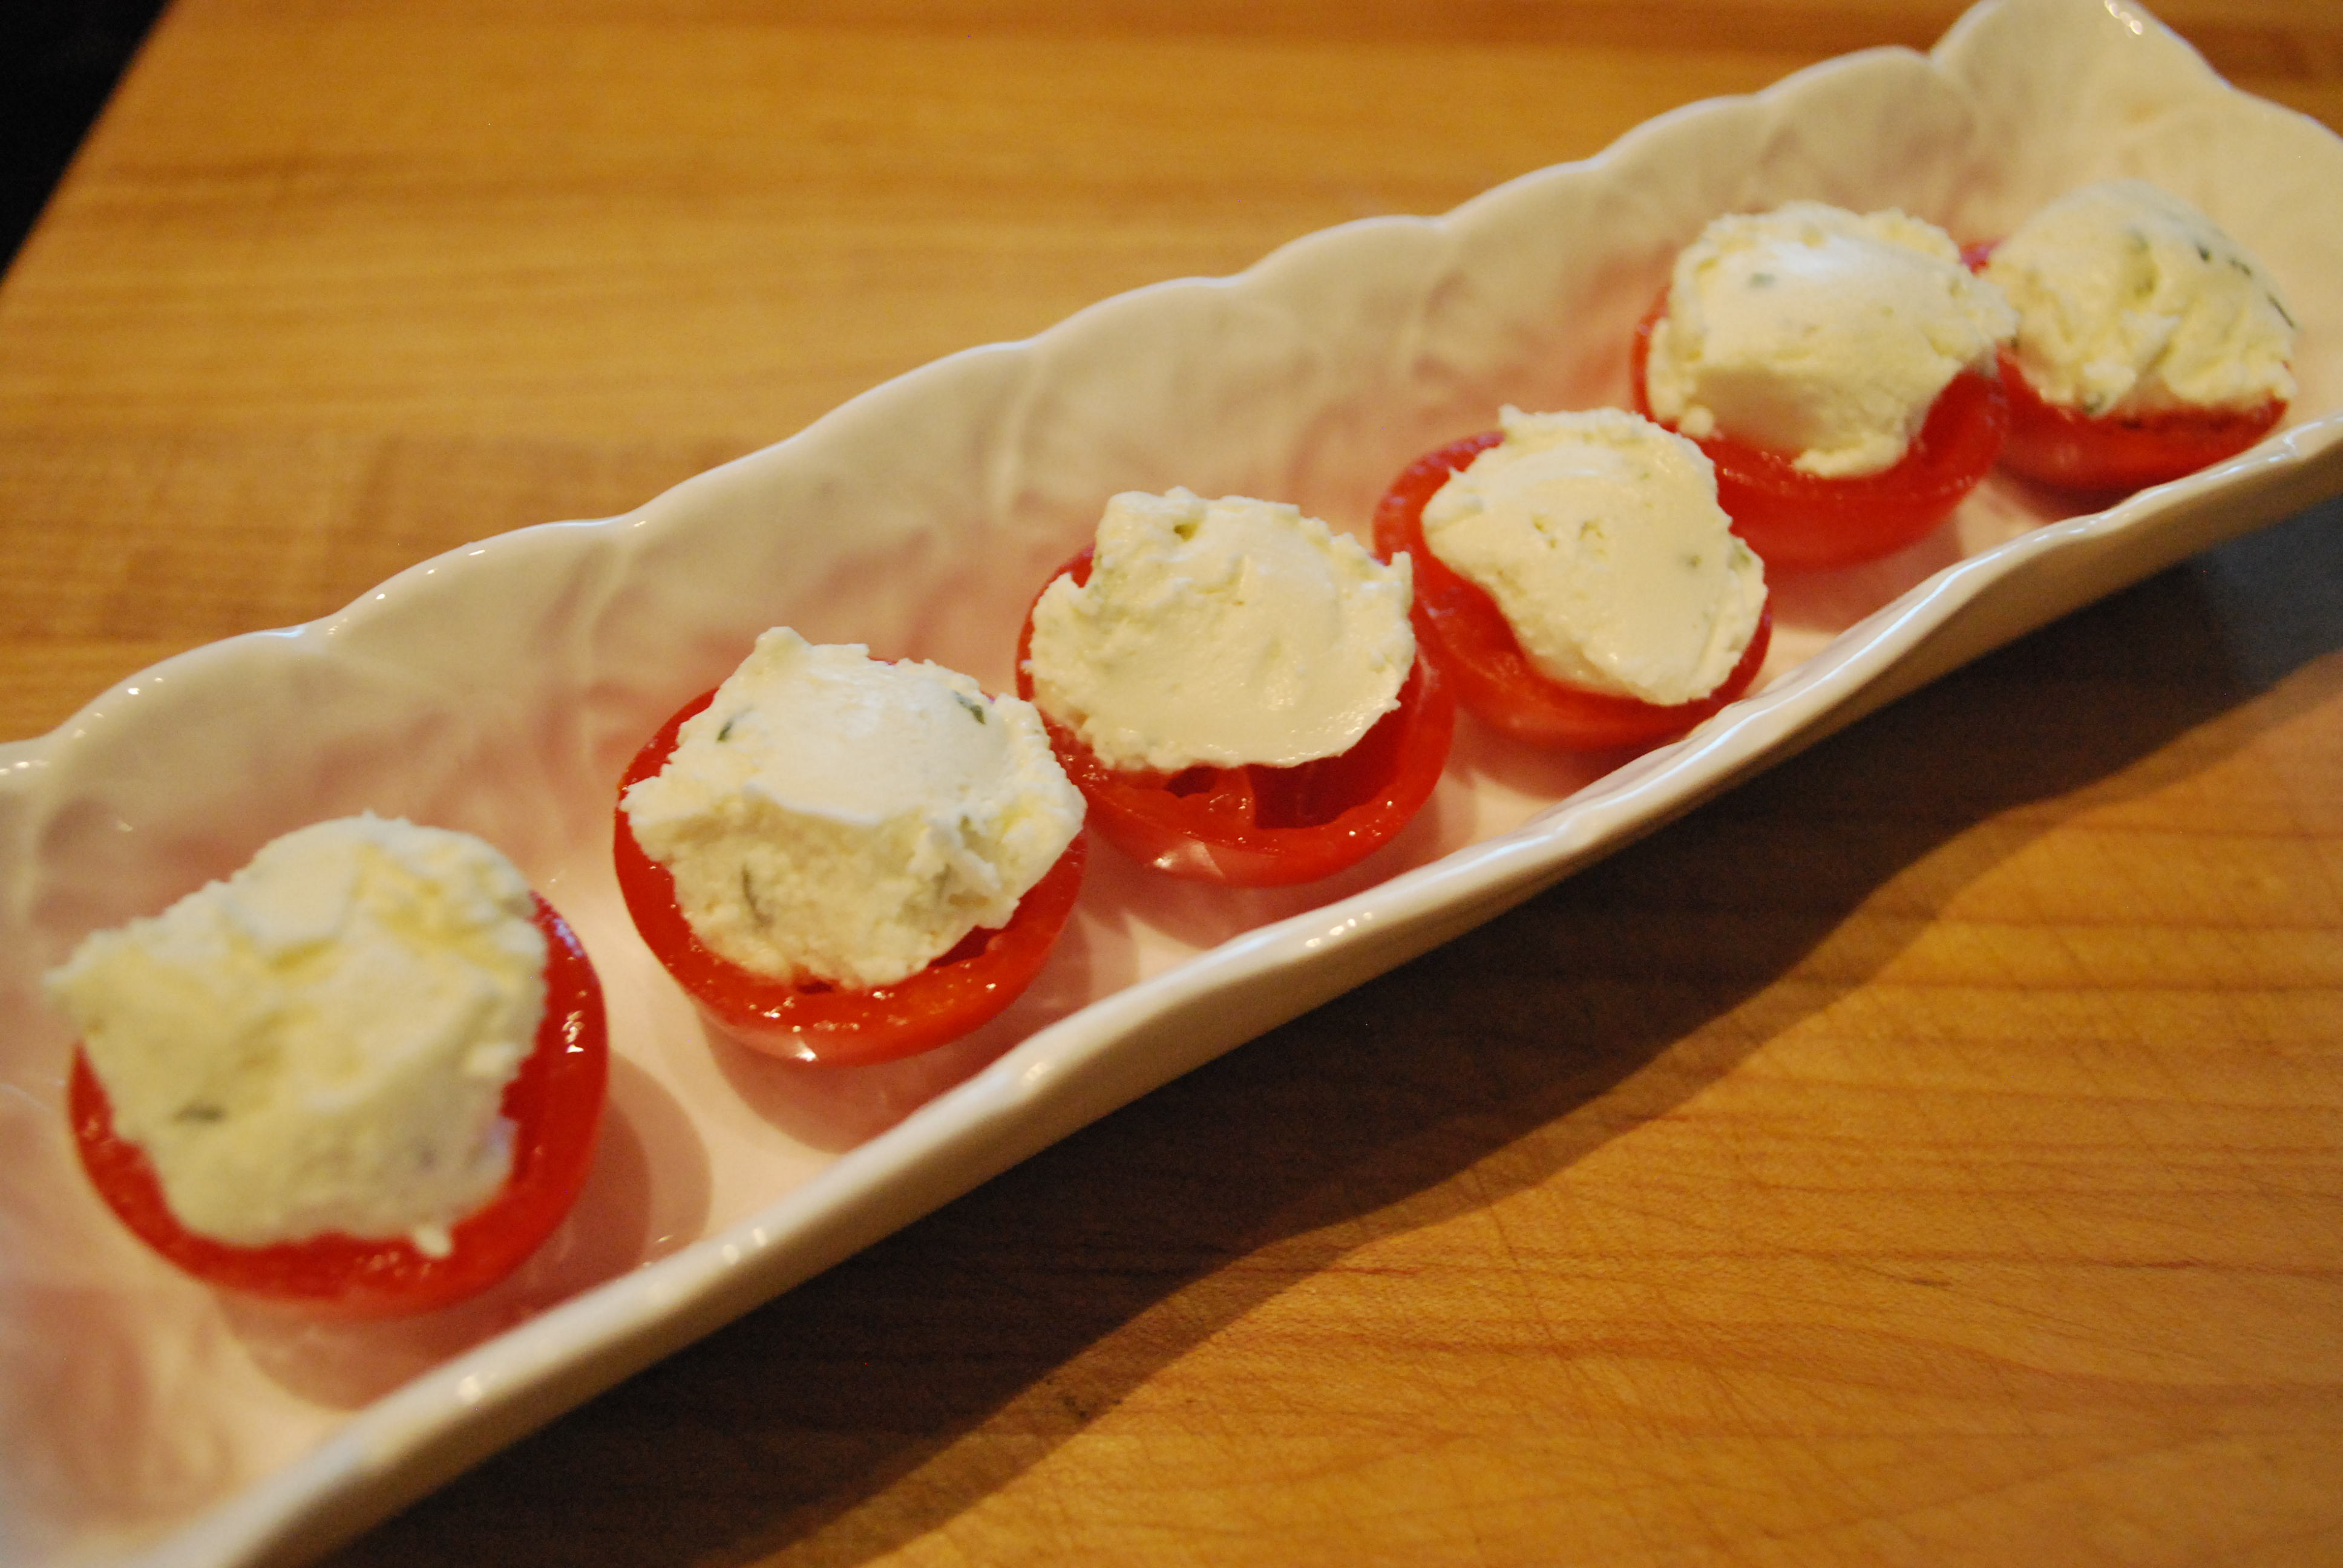
The following simple idea for an appetiser brings together five of my all-time favourite ingredients, into one luxurious mouthful. Perfect as they are, accompanied with an aperitif, or perhaps as part of an antipasto platter; I hope you’ll agree that the flavours intermingle superbly and leave you craving for more.


Using a sharp knife, slice the cherry tomatoes in half and gently scoop out the seeds with a teaspoon. Scoop a little Boursin onto the tomato halves and top with a basil leaf. Drizzle lightly with olive oil and balsamic vinegar.


Once a week, I meet up with some friends (other parents from my children’s school) for a morning coffee at a little local pub/cafe. It can often be quite an eclectic group, comprising of Japanese, Swedish, American, Ni-Vanuatu and of course a few Australians added to the mix. Spending time amongst this small but diverse array of nationalities, I most love the fact that there’s often such interesting and varied perspectives as we sit and chat about all manner of things. It reaffirms for me that we can learn so much from each other and that in doing so, the world somehow doesn’t feel quite so vast anymore.
With that said… my Japanese friend, who comes along to sip coffee each week, is the reason for this post. She is as passionate about cooking and food as I am and over the years that I’ve known her, she has imparted not only much knowledge about life in Japan, but also (to my delight and great interest) knowledge about Japanese food. A week ago, she ever so kindly brought me a gift of some small purple-skinned Japanese sweet potatoes to try. I baked them in the oven as instructed and was amazed at how different in flavour they were from any sweet potato I’d tasted before. Much sweeter than what I was used to, but with my penchant for sweet things, they were savoured and devoured without a hint of hesitation. I’ll be looking out for them in future…
The following recipe, inspired by this lovely lady, has been readily welcomed into our home. It’s simple to prepare, beautifully aromatic in the kitchen and so full of flavour.
Watashi no yūjin arigatō! xx
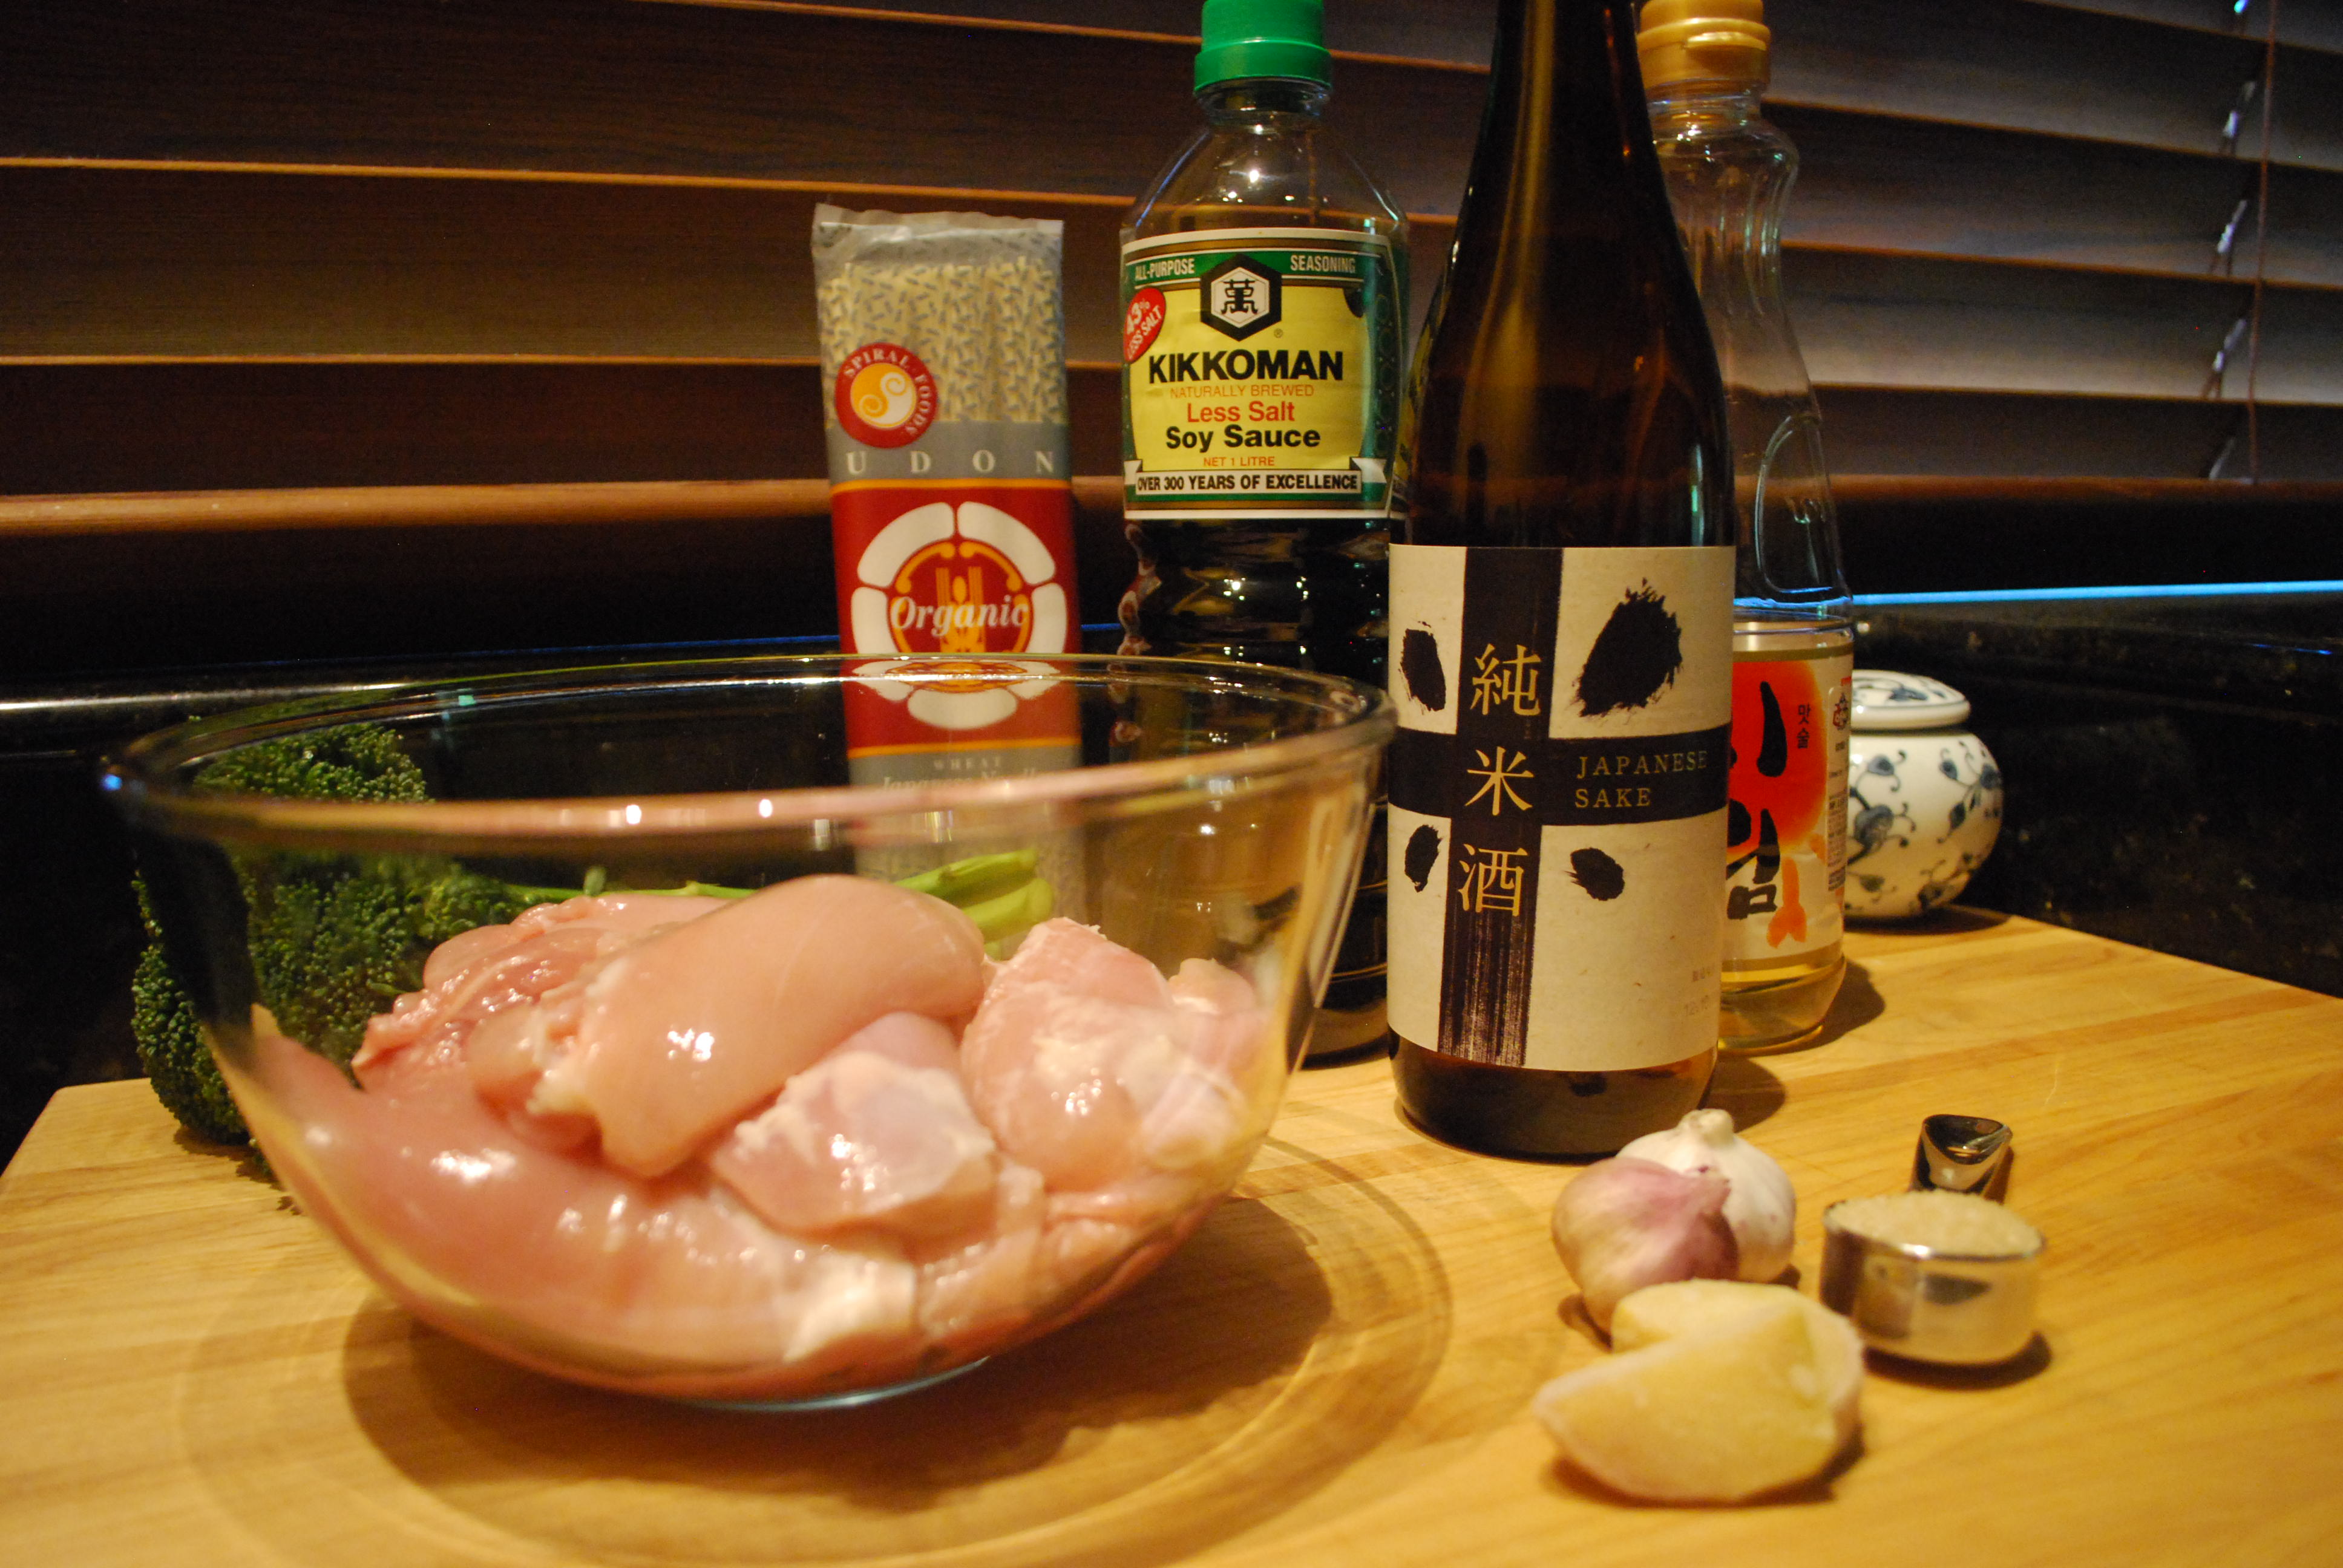
In a small saucepan, combine the soy sauce, mirin, sake, raw sugar, garlic and ginger. Place the pan over medium to high heat and bring to a boil, stirring occasionally to ensure the sugar has dissolved. Once bubbling, reduce the heat and allow to simmer for about 10-15 minutes or until slightly syrupy. Be sure to taste as you go, to ensure a sauce well balanced in flavour. Remove the pan from the heat and allow to cool to room temperature. Strain the sauce to remove the chunks of garlic and ginger.
In a glass or ceramic bowl, marinate the chicken thigh fillets with the cooled Teriyaki sauce, cover and refrigerate for several hours (if time permits).
I prefer to bring all meat to room temperature before I cook it, so approximately one hour before I plan to start cooking I’ll remove the chicken from the refrigerator. Please feel free to make your own decision regarding this step.
Bring a large saucepan of water to the boil for the noodles. Depending on the noodles, these will usually take about 10 minutes to cook. Use your own judgement (after reading the next two steps) as to when you should put the noodles in to cook.
Heat the oil in a large frying pan over medium heat and gently fry the chicken pieces (being sure to reserve the marinade). Feel free to brush a little more of the marinade onto the chicken pieces as they cook. Once done, remove the chicken from the pan to rest somewhere warm for a few minutes while you finish off the sauce.
Pour the remaining sauce that the chicken was marinating in, into the frypan and bring to a boil, allowing it to simmer and reduce for about 5 minutes. I like to add the broccoli (or other green veggies) in with the sauce while it simmers – though please feel free to steam or boil them separately to your liking and serve on the side or toss through with the noodles and chicken at the last minute.
To serve, slice the chicken into bite-sized pieces and combine with the noodles, extra sauce and vegetables in a large serving bowl.


It’s no great secret that my palate leans somewhat guiltily to the sweet side rather than the savoury. Another one of those genetic things, I think… Now, I don’t take sugar with my tea or sprinkle it on my morning cereal and I’m not at all tempted by the rows of chocolate bars in the supermarket, but when it comes to desserts… a perfectly baked cheesecake, a citrus tart, a silken pannacotta or sweet treats, like macarons or freshly-baked crostoli, I tend to go weak at the knees. Continue reading

In it’s ideal state, food should be a feast for all of the senses. Taste is almost always at the core and rightly so, as it is usually the flavour of things that keeps us coming back for more. The visual, aromatic and textural side of food serves more to transform what could be just fuel for the body into an actual experience to be savoured. For me, this sensory awakening often begins way before the food reaches the table. Continue reading

With somewhat ulterior motives, I began not so long ago, to trace some of our family history. Knowing that predominantly my ancestry winds it’s way back to English and German origins, I was actually secretly hoping to uncover that gem of a find that I had a drop or two of Italian blood coursing through my veins. Not just because so much of the country is jaw-droppingly picturesque and packed full of history and culture, or that the deliciousness of their food and wine leaves me so constantly in awe… but mostly because I would love dearly to have grown up with an Italian Nonna in my life. Complete with her opinionated wisdom on all facets of life and her deep sense of family and love to knit everyone together. Countless stories she would have told of people and places from her past long ago and while she was telling these stories her hands would be busy kneading dough, rolling pasta, or stirring a pot of the most aromatic ragu ever to grace a cucina. The sights and sounds and smells would have seeped into my very being, guiding me and staying with me right the way through life.
Alas, I found nothing surprising except an English convict or two to colour my family tree, so I’ll leave you with something of an aromatic recipe which unfortunately comes not from my Nonna, but with love and essence of Italy all the same. Salute!

Heat the olive oil in a large saucepan over low/medium heat. Add the onions (with a good pinch of salt) and fry gently for about 8-10 minutes until softened. Next, stir in the garlic, parsley, dried chilli, capsicum and fennel, continuing to fry gently for 5 minutes or so. Pour in the tinned tomatoes and tomato paste and continue to cook another 10 minutes. Pour in both the wine and stock, bring to the boil and then reduce heat to simmer for another 10 minutes. Season to taste with salt and pepper while the soup is simmering. Add the fish pieces and partially cover the saucepan with a lid, simmer for about 4-5 minutes, before adding the prawns for a further 3-4 minutes until cooked. The calamari rings should go in for the final minute or so of cooking.
Top with lemon zest and basil and serve immediately. Absolutely perfect with a loaf of fresh, crusty bread on the side.


I’d like to be up front in saying that I don’t believe in using reduced or low-fat dairy options, or any form of margarine or blended butter-impersonating spreads in my cooking. It seems to me that too much tampering with milk, cheeses, yoghurt and butter is turning what should be such natural, traditional products into the laboratory-created frankensteins that line the refrigerated shelves of our supermarkets. Continue reading

Growing up with a mother who was (and very much still is) a wonderful cook, I’ve desperately wanted my own children to feel that same love and warmth that comes from food created purely for their pleasure.
Like the favourite books that were read to them over and over when they were little, I’m finding that certain creations from the kitchen can evoke that same level of comfort and security. Their faces lit up with the anticipation of the first bite is such a beautiful reward!
The recipe to follow is one such delight – for a morning or afternoon tea that warms the hearts of both children and adults alike! After years of frustrations and flops, these Perfectly Fluffy Scones are there to be slathered with jam and freshly whipped cream practically every week in our home.
I live by the mantra “Everything in Moderation” – so while my recipes and ideas will rarely be of the low-fat variety, it’s important to think about portion sizes and to find a healthy balance in the variety of food going into your body.
Pre-heat the oven to 200°C. Line a baking tray with baking/parchment paper.
Sift the flour into a large mixing bowl. Dice the chilled butter into small cubes and using fingers, rub the butter thoroughly into the flour (making sure no lumps of butter are left). Add a pinch of salt and the sugar and mix through.
Make a well in the flour mixture and pour in the milk. Using a blunt/bread and butter knife, mix the ingredients until they come together. The mixture should be neither sticky or dry – if so, add (a little at a time) more flour or milk.
Remove the dough from the bowl and pat out gently (please don’t knead it whatsoever) on a lightly floured board to about 3cm high. Use a 6cm round scone/cookie cutter to make approx 8 scones. Place the scones (evenly set apart) onto the lined baking tray.
Bake at 200˚C for approx 10 minutes, or until just starting to turn golden of top.
Serve with good quality jam and some freshly whipped cream (which can be sweetened slightly with a tablespoon of icing sugar and a little vanilla extract).


