Category Archives: Cooking

Hokey Pokey Biscuits

Gather and Graze, Hokey Pokey Biscuits

There are some places in the world that eat into your very soul and become a part of who you are. Places of near impossible beauty, both in their surrounds and in their essence.

I left behind a sizeable chunk of my heart to such a place. I wasn’t ready to leave (perhaps I never would have, if given the choice), but love of another kind and duty dictated it to be so. I believe that one day we will return, my heart and I, to piece it back together and be whole once again. Continue reading

Smoked Trout and Almond Linguine

Smoked Trout and Almond Linguine, Gather and Graze

With the slightly warmer weather enticing us to sit outside through to the early evening, it’s time again to bring out the nibbly platters. A little cheese, a few olives, some cured meats… all the things that go perfectly with a chilled glass of white or rosé! My current favourite is to include a fillet of smoked trout or salmon on the platter, from the ‘Eden Smokehouse’ (their beautiful smoked seafood products are available, I believe, throughout most of NSW and the ACT in Australia). Though I’m sure that in your part of the world, there will be something of a similar nature that will work just as well.

The other evening, I discovered that smoked trout also goes brilliantly tossed through with some pasta, and a few other simple ingredients. A quick, stylish dish, that requires minimal time cooking (something that will be much appreciated as it warms up even further throughout the summer months). The toasted almonds added at the very end, add a wonderful taste and texture to the dish, so be sure to have some on hand.

Smoke Trout and Almond Linguine | Gather and Graze

  • 400g Linguine (or other long pasta)
  • 15g/1 Tablespoon Unsalted Butter
  • 2 Garlic Cloves (finely sliced)
  • Zest of 1 Lemon
  • 1 Tablespoon Wholegrain Mustard
  • 250ml/1 Cup Heavy Cream
  • 1-2 Tablespoons Lemon Juice
  • Sea Salt and Black Pepper
  • 200g Fillet of Smoked Trout (or Salmon)
  • Handful of Chopped Italian Parsley (and/or Chives)
  • Large Handful of (Toasted) Slivered Almonds

Place a large pot of water on to boil for the pasta.

While you’re waiting for the water to come to the boil, place the cream, lemon zest and mustard into a small mixing bowl. Season with a little sea salt and black pepper, stir to combine and then set aside for the moment.

Flake the smoked trout and also set aside.

When the pasta water has come to the boil, stir in some sea salt and add the pasta, cooking until al dente.

While the pasta is cooking, place a frypan over low/medium heat. Add the butter to the pan and when the butter has stopped foaming, add the garlic and fry gently for a couple of minutes. Now stir in the cream mixture and allow to simmer gently for about 5 minutes, until slightly thickened. Stir in the lemon juice and the flaked smoked trout and continue to cook for another minute or two, until the trout is warmed through. Check for seasoning and adjust with sea salt, pepper or lemon juice if required.

When the pasta is cooked, drain and add it to the sauce, stirring gently to coat each strand.

Place into bowls or a serving dish and top with the fresh, chopped herbs and toasted almonds. Serve immediately.

Perfect with a glass of white wine and a loaf of crusty Italian bread on the side.

Smoked Trout and Almond Linguine, Gather and Graze

Chocolate-Hazelnut Brownies

Chocolate Hazelnut Brownies, Gather and Graze

Time slips away so incredibly quickly these days. I would dearly love to have the time to play around with food, more than what I do. To find time to re-create certain dishes with a little more of this, a dash less of that, perfecting and fine-tuning. Sometimes you desire just one more shot at satisfying your own somewhat critical palate and eye.

These brownies are decadent, rich and full of flavour. I’ve adjusted the quantity of ground hazelnuts after making this batch, as I am certain that they would benefit from an even higher level of nuttiness. With my youngest child known to side-step anything with obvious chunks of nuts in them, I can thankfully get away with these (using nutella and ground nuts); though I do feel that they could really benefit from some larger pieces of hazelnut thrown in for extra texture, if you’re keen to give it a try.

I’ll be making these again in the not too distant future, though with variety being the spice of life, one batch of Choc-Hazelnut Brownies this week will do…

Have a wonderful week everyone!

Chocolate-Hazelnut Brownies | Gather and Graze

  • Servings: 16 Squares
  • Print

  • 100g Unsalted Butter
  • 200g Dark Chocolate
  • 150g Nutella
  • 3 Free-Range Eggs
  • 175g/¾ Cup Raw (Caster) Sugar
  • 100g/½ Cup Ground Hazelnuts
  • 75g/½ Cup Plain Flour
  • Pinch of Salt
  • A little Icing Sugar (for dusting the tops)

Pre-heat the oven to 170°C. Grease and line the base of a 20cm x 20cm brownie/cake tin.

Place the butter and chocolate into a small saucepan over low heat. Stir to combine and remove from the heat as soon as they have just melted. Add the Nutella and stir gently until completely mixed in.

Using an electric mixer, beat together the eggs and sugar until pale and creamy. Stir in, spoonful by spoonful, the chocolate/Nutella mixture until incorporated and smooth. Then fold in the ground hazelnuts, flour and salt.

Pour into the prepared tin and bake for approximately 45-50 minutes, or until a toothpick comes out fudgey, not gooey.

Allow to cool, before slicing into squares and dusting with icing sugar.

Chocolate Hazelnut Brownies, Gather and Graze

Cooking Notes:

  • Consider adding 100g/½ Cup of Chopped Hazelnuts to the mixture as you add the flour, for extra texture.


Rhubarb and Raspberry Tart

Rhubarb and Raspberry Tart, Gather and Graze

There are certain fruits and vegetables that I adore seeing on display at the Farmer’s Markets, but I never quite know what I’d make with them if I gathered them up and brought them home. Things like persimmons, pomegranates, quinces, globe artichokes and kale all fall into this enticing, yet somewhat untried and untested category. Invariably I find myself wandering the stalls until I reach produce that I’m comfortable with, produce that speaks to me immediately with recipe ideas. The berries, the stone fruit, the citrus, the root vegetables, the salad greens. In fact, come to think of it, there’s actually quite a lot that I don’t walk past… I guess it just feels that way sometimes.

With this innate feeling that I’m missing out on experiencing these seasonal treats, the plan is to gradually overcome this little shortcoming by delving into these delights that others know and understand already. I feel very lucky in the fact that many of the food bloggers I follow, either come from or live in parts of the world where the use of these ingredients is nothing unusual, so a wonderful selection of recipes and knowledge is there to be discovered.

For me, rhubarb falls on the fringe of this category. We used to (quite happily) eat bowlfuls of stewed rhubarb, with a dash of milk, cream or ice-cream stirred through, for dessert when I was growing up. It’s just unfortunately something that I don’t tend to cook for my own family. Time to turn that around!

Rhubarb and Raspberry Tart | Gather and Graze

I used a delicious shortcrust pastry recipe from a British/Dutch blog named ‘My Foodtopia’ – please see here for the link to the pastry recipe. It made enough pastry for not only the rhubarb tart, but for a dozen gorgeous little Strawberry Jam Tartlets as well (which were baked in a muffin tin) – photo attached here.

I found it best to make the pastry first, press it into the tart tin and then allow it to rest/chill in the refrigerator while the filling is being made.

Ingredients for the filling:

  • 450g Rhubarb (chopped)
  • 220g/1 Cup Raw Sugar
  • 125ml/½ Cup Freshly Squeezed Orange Juice
  • 1 Teaspoon Vanilla Paste or Extract (or the seeds from 1 Vanilla Pod)
  • 100g Raspberries (Fresh or defrosted from Frozen)

Place the rhubarb, sugar, juice and vanilla into a medium saucepan and bring to a boil. Stir to dissolve the sugar, then allow to boil for about 10 – 15 minutes (stirring occasionally) until it becomes a jam-like consistency. Remove from the heat, stir in the raspberries and allow to cool completely.

Once cool, spoon the mixture into the prepared tart case and top with pastry lattice. Brush the pastry with a little egg wash (1 egg beaten with a teaspoon of milk or water).

Rhubarb and Raspberry Tart

Place into the oven, pre-heated to 180°C and bake for approximately 40 – 45 minutes or until the pastry is golden brown.

Allow to cool completely, before serving with whipped cream and/or ice-cream.

Rhubarb Raspberry Tart, Gather and Graze

  • Filling recipe inspired by, but adapted from a Gourmet Traveller recipe.

Summer Strawberry Jam

Strawberry Jam Gather and Graze

It’s a beautiful thing to make use of fresh, raw ingredients straight from the garden or farmer’s market. Most often to eat exactly as nature intended… though many a Saturday during the warmer months of the year, I find myself returning from the markets with a basket  and bag overflowing with produce – my enthusiasm getting the better of me.

That’s where preserves come in. The following is a simple recipe, though one that produces a delicious jam, packed full of flavour, with just the right amount of tartness from the lemon juice to cut through the syrupy sweetness.

It was a fabulous breakfast this morning of strawberry jam slathered croissants.

Summer Strawberry Jam | Gather and Graze

  • 750g Fresh Strawberries (hulled)
  • 60ml/¼ Cup Lemon Juice (freshly squeezed)
  • 125ml/½ Cup Water
  • 1 Teaspoon Rose Essence (optional)
  • 500g/2¼ Cups Raw (Caster) Sugar

Place the strawberries, lemon juice, rose essence (if using) and water into a large saucepan and bring to a simmer over low-medium heat. Cook for approximately 10-15 minutes, until the fruit has softened completely.

Add the sugar and stir to dissolve. Bring to the boil and allow to bubble away for another 10 minutes or so, until thickened. Keep a very good eye on the pot and stir regularly to avoid any burning on the base.

For jam to reach setting point it should be about 105°C (220°F) – test with a thermometer if you have one. Otherwise, have a small plate standing by in the freezer, to which you can scoop a little jam to test  –  put the plate back in the freezer for a minute or two – if it is ready it will gel together nicely, as jam usually does. 

Remove the pot from the heat and allow to cool for 5-10 minutes (removing any foam from the top) before scooping into warm, sterilised jars. Seal immediately and allow to cool completely.

Cooking Notes:

  • To sterilise the jars and lids – wash in warm, soapy water, then rinse well and place on a tray in an oven pre-heated to 130°C for about 20 minutes. Or you can boil them in a large saucepan for 15 minutes.
  • Be sure to place hot preserves directly into hot jars and cold preserves into cold jars.

Chocolate Crackle Cookies – Not a Rice Bubble in Sight!

chocolate crackle cookies Alice Waters

These are the cookies that almost never were…

Flicking through the pages of one of my favourite cookbooks, I almost paid off this recipe completely, by the mere title of it. You see, for Australians and New Zealanders, Chocolate Crackles are one of the mainstays of children’s Birthday parties. Rice Bubbles (the equivalent of Rice Crispies elsewhere) are congealed together using Copha (hydrogenated coconut oil), cocoa, desiccated coconut and icing sugar. No baking required – just show a little patience and that copha will re-solidify! I’m very well aware that many children (and adults) were delighted to find Chocolate Crackles adorning the party table… just NOT me! I was always more of a Honey Joy kind of girl… Continue reading

Pasta con Pollo e Funghi | Chicken & Mushroom Pasta

Pasta Pollo Funghi | Chicken and Mushroom Pasta | Gather and Graze

‘Gather and Graze’ is not about preparing elaborate, complicated meals – that was never my intention. Mostly it’s about sharing food, recipes and ideas that bring both happiness and nourishment to our own small family. It is also published in the unwavering hope that it will reach those people teetering on the verge of discovering how wonderfully simple cooking can be… Continue reading

Asian-Infused Salad

Asian cabbage salad gather and graze

I know that we’re not out of the woods yet… our spring has a fickleness about it, that is known to throw us back into wintery weather with little warning, at any given time. We’re still a few weeks away from predictable warmth and sunshine.

Rather encouragingly though, this past weekend has seen us while away the lunch hour outside on our back deck with a rather different style of food than in the months gone by. No more of the heavy, comfort-giving winter fare. With the onset of spring my body seems to unsurprisingly be craving the freshness and lightness of salads, grilled meat and fresh fruit.

Asian-Infused Salad | Gather and Graze

  • ¼ Red Cabbage
  • 1 Medium Fennel Bulb
  • 3 Spring Onions/Green Shallots
  • 1 Medium Red Capsicum/Sweet Pepper
  • Large handful fresh Coriander
  • 1 Cup Roasted Unsalted Cashew Nuts

Thinly slice the cabbage, fennel and spring onions. Dice the capsicum. Chop rather roughly the coriander (including the stalks) and also the cashew nuts.  Combine all these ingredients together in a bowl and toss through as much of the dressing below as required. Top with a few extra chopped cashew nuts.

Dressing

  • ¼ Cup Vegetable Oil
  • ¼ Cup Mirin (or Rice Wine)
  • 1 Tablespoon (Salt-Reduced) Soy Sauce
  • 1 Tablespoon Sesame Oil
  • Thumb-size piece Fresh Ginger (finely grated)
  • A good squeeze of lemon juice
  • A couple of grinds of Sea Salt and Pepper
  • 1 Tablespoon Sweet Chilli Sauce (optional)

Whisk all ingredients together in a bowl until completely combined. Adjust the amounts of soy sauce and lemon juice, as required.

Asian cabbage salad Gather and Graze

Moelleux au Chocolat | Chocolate Lava Cakes

Moelleux Chocolat | Chocolate Lava Cakes | Rachel Khoo Recipe | Gather and Graze

A life has not truly been lived, without experiencing a dessert such as the ‘Moelleux au Chocolat’. Every now and then, you hit upon something that makes your eyes light up and leaves you completely and utterly speechless… Continue reading

J-P’s White Chocolate Panna Cotta

White Chocolate Panna Cotta Gather and Graze

Quite possibly, tonight’s dessert will feature in the dreams of my children. I can almost guarantee that it will feature in mine! Continue reading

Easy Weekend Orange Cake

Orange Cake Gather and Graze

A quick little recipe post for my lovely Mum, who I think was worrying that I was worrying too much about the health issues of the world this week. An effortless yoghurt and orange cake to welcome the weekend and to wish you all much happiness (and hopefully a little sunshine to enjoy) over the next few days. Solving the obesity epidemic can wait ’til next week! 😉

Easy Weekend Orange Cake | Gather and Graze

  •  250g/1 Cup Unsalted Butter
  • 220g/1 Cup Raw Sugar
  • Zest of 1-2 Oranges
  • 3 Free-Range Eggs
  • 300g/2 Cups Plain Flour
  • 1 teaspoon Baking Powder
  • Pinch of Salt
  • 180g/ 2/3 Cup Greek Yoghurt
  • 80ml/ 1/3 Cup Freshly Squeezed Orange Juice
  • Icing Sugar (for dusting over the top)

Pre-heat the oven to 180°C. Grease and line the base of a 22cm round cake tin.

Cream the butter, sugar and orange zest in an electric mixer until light and fluffy. Add the eggs one at a time and mix until combined.

In a measuring jug, mix together the yoghurt and orange juice.

In a separate bowl, sift together the flour, baking powder and salt.

Add the dry ingredients in 2 or 3 lots to the butter mixture, alternating with the yoghurt/juice. Mix each addition through gently, until completely combined.

Scoop the mixture into the cake tin and bake for approximately 45 minutes, or until a skewer comes out clean.

Allow cake to cool for 10 minutes, before turning out of the tin. When cool, dust with icing sugar or decorate as you wish.

Orange Cake Gather and Graze

Cooking Notes:

  • Please note that this cake is best eaten on the same day it is baked. For some reason it becomes somewhat denser the day after it is cooked and even more so by the second day.
  • The raw sugar will also give a slightly denser crumb to the cake – feel free to use caster sugar if you prefer a slightly lighter texture.
  • Take care to watch the cake in the final 10 minutes or so of cooking, to make sure the top doesn’t brown too much. Cover loosely with a sheet of foil if you feel that it is.
  • This cake is lovely served with a dollop of Greek Yoghurt on the side.

Elizabeth Apple Pudding

Elizabeth Apple Pudding Gather and Graze

How lovely to have a dish named after you. What an honour! The Victoria Sponge… Pavlova… Sacher Torte… Peach Melba… Tarte Tatin… Pizza Margherita… Beef Wellington… Beef Stroganoff… Beef Carpaccio… to name but a few – all created to pay homage to a deserving individual or otherwise named to provide lasting fame for the genius who concocted the special dish.

On a cold winter’s night, is there anything better than indulging in a hot pudding for dessert! My thanks go to Elizabeth – whether she be Queen, grandmother, daughter, friend or other fine, charismatic woman for inspiring or creating this delicious, heart-warming dessert! Another little find from within the ‘Green and Gold Cookery Book’. Such a deep sense of pleasure, drumming up recipes from the past, so that they don’t slip away into oblivion.

Elizabeth Apple Pudding | From the 'Green and Gold Cookery Book'

  • 220g/1½ cups Self-Raising Flour
  • 220g/1 cup Sugar
  • Pinch of Salt
  • 1 Teaspoon Ground Cinnamon
  • ¾ cup Full-fat Milk
  • 1 Free-Range Egg (Lightly Beaten)
  • 15g/3 Teaspoons Unsalted Butter (Melted)
  • 2 Small Apples (Peeled and Cored)

Pre-heat the oven to 180°C. Grease a 5-6 cup-capacity deep baking dish with butter and sprinkle a little sugar over the base.

Slice the apples into quarters and then slice each quarter into three. Line the base of the baking dish with the apple slices.

DSC_0039

Into a large mixing bowl, place the flour, sugar, salt and cinnamon. Whisk to remove any lumps. Add the milk, egg and melted butter and continue whisking until smooth and completely incorporated. Gently pour the thick batter over the top of the apples.

Bake for approximately 45 minutes or until the top springs back when gently pressed in the centre. Before serving, invert the pudding onto a plate, so that the apples are on top. Sprinkle lightly with a little extra cinnamon if you wish…

Serve hot, slathered with your choice of cream, custard or ice-cream.

Elizabeth Apple Pudding Gather and Graze

Cooking Notes:

  • Keep an eye on the pudding as it bakes – if the top looks like it is browning too quickly, cover loosely with a sheet of aluminium foil.
  • The recipe calls for quite a lot of sugar, though the finished pudding certainly wasn’t over the top in sweetness. Next time I’ll experiment with reducing the quantity to see how it fares…

Comforting Chicken and Orzo Soup

Chicken Orzo Soup Gather and Graze

A few weeks ago when my children and I were unwell, I went searching for the ultimate in health-promoting, comforting and most importantly… delicious-tasting soups. It was a given that it had to be based around chicken, but when I came across this rather lovely recipe featuring leeks, garlic, lemon and a little pasta, I knew that I’d found exactly what I was looking for! It is a recipe that I’ve adapted (ever so slightly) from one of my favourite Neil Perry cookbooks, called ‘The Food I Love’.

I’m absolutely kicking myself that I didn’t discover this soup years ago… all those years that have passed when we could have been indulging and restoring ourselves through the colder months of the year. Therefore, starting immediately is our belated, but now completely embraced tradition of chicken soup to warm the body and soul.

Chicken & Orzo Soup | Gather and Graze

Ingredients

  • 300g Free-Range Chicken Breast(s)
  • 8 Peppercorns/1 Star Anise/1 Bay Leaf
  • 100g Orzo/Risoni Pasta (or any other small pasta shape)
  • 2 Tablespoons Olive Oil
  • 2 Leeks (washed and sliced finely)
  • 2 Cloves Garlic (finely chopped)
  • 1 Litre Good Quality Chicken Stock
  • Zest and Juice of 1 Lemon
  • Sea Salt and Black Pepper
  • Finely Grated Parmesan Cheese to serve (optional)
  • A Handful of Chopped Flat-Leaf Parsley (optional)

Instructions

    The first two steps of this recipe can be done well ahead of time if you like and then placed in the fridge until you’re ready to start cooking the leeks/garlic.

    Fill a medium-sized saucepan with water and add the peppercorns, star anise, bay leaf (or any other herbs, spices or aromatics that you desire). Bring to the boil and then turn off the heat completely. Place your chicken breast(s) into the pot with the poaching liquid and leave for about 2 hours. Remove to a bowl to cool, before shredding.

    While the chicken is poaching, place a small saucepan filled with water on the stove and once again, bring to a rolling boil. Add some sea salt and then the orzo pasta, giving a quick stir to make sure none is stuck together and then cook until al dente (tender, but with a slight bite). When ready, drain the orzo and rinse gently with cold water. Set aside for later.

    About half an hour before you want to serve dinner, place a large saucepan over medium heat. Add the olive oil, along with the chopped leeks, garlic and a little sea salt. Allow to sweat for about 10 minutes or so, until the leek has softened. Then add the chicken stock, lemon zest and juice (depending on the size and type of lemon, you may wish to add half of the juice at first and then taste to see if more is required) and simmer for another 10 minutes.

    At this point it’s up to you to decide whether to puree the soup or not. With one of my children averse to the sight of cooked vegetables in any soups or stews, I decided that a couple of minutes of whizzing the soup with a stick blender was the only way that he might enjoy it. It worked!

    Now add the shredded chicken and orzo into the soup and stir gently to combine. When the chicken and orzo are warmed through, the soup is ready to serve.

    This soup is lovely as it is, or perfect with some finely-grated parmesan cheese and some chopped flat-leaf parsley scattered on top… with some crusty bread on the side too!

    Chicken Orzo Soup Gather and Graze

  • Recipe slightly adapted from Neil Perry’s ‘The Food I Love’ cookbook

My kind of Fast-Food: Home-Cooked Pasta Carbonara

Pasta Carbonara Gather and Graze

On nights like tonight, after baking batches of muffins and cookies for children’s end of term parties at school tomorrow, a quick, easy pasta dish for dinner was all I had time for. I love that this recipe is cooked in the time it takes to boil the water and cook the pasta. It’s always a hit with the kids, especially when served with a little garlic bread on the side!

There are so many fabulous variations of Pasta Carbonara out there, but I still felt keen to document and share this particular version – it’s the one we’ve been cooking for years now and we still haven’t tired of it.

A quick post for a quick pasta!

Pasta Carbonara

  • Servings: 3-4 (enough for our family…)
  • Print

  • 300g (Dried) Pasta
  • 1 Tablespoon Olive Oil
  • 200g Diced Speck (or Bacon)
  • ¼ cup White Wine
  • 2 Free-Range Egg Yolks
  • 100mls Pouring Cream
  • A large handful of Finely Grated Parmesan (or Grana Padano) Cheese
  • A sprinkling of Freshly Ground Nutmeg
  • A little Sea Salt and Pepper

Place a large pot of water on the stove and bring to a rolling boil. In a book I’m currently reading, ‘In Search of Total Perfection’, Heston Blumenthal recommends about 1 litre of water for every 100g of pasta.

While the water is coming to the boil, place the egg yolks, cream, parmesan, nutmeg and seasonings into a small mixing bowl and stir well to combine. Set this bowl aside for later on.

Once the water is boiling, add some salt (another Heston tip: add 10g of salt for every 100g of pasta) and give a quick stir before throwing in the pasta. Stir again gently to make sure none of the pasta is sticking together.

In a medium-sized frying pan over med-high heat, pour in the olive oil and when hot, add the speck. Fry until nice and golden. Turn the heat down a little and add the white wine, stirring to lift any little bits of speck stuck to the bottom of the pan. Allow the wine to simmer for a few minutes until syrupy and then turn off the heat.

Keep an eye on the pasta and strain it in a colander as soon as ‘al dente’ (tender, but with a slight bite). Add the drained pasta directly into the frying pan and toss briefly in the oil and speck until all of the pasta is coated. Remove the pan from the stove (so that the sauce doesn’t curdle from the eggs coming in to contact with too much heat) and stir in the egg/cream mixture. The sauce will thicken slightly with this gentle stirring. Check for seasoning and adjust if necessary. Serve immediately.

Cooking Notes:

  • If you can find good quality Speck where you live, please give it a try! It has a slightly smoky flavour and a touch of juniper berry, that is really wonderful in this dish.

Spiced-Up Chocolate Chip Cookies

Spiced Chocolate Chip Cookies Gather and Graze

The last few weeks have primarily been spent nursing children (and myself…) back to health from the coughs and colds that winter invariably brings. Days spent juicing oranges, reading books, cooking comfort food and playing the occasional quiet board game… fine for a day or two, but let’s just say I’m thankful that children are now back at school and that life can finally drift back to normality. Drafts for three different posts I’d hoped to share with you, sit half-written from this period. All seemed a little flat and lacklustre (exactly as I was feeling) in both the writing and photos, so when time permits I’ll attempt to spice them up with some new, improved photos and a touch of editing, before sending them out. A winter-warming soup and a beautifully fragrant casserole were amongst the three, so it really won’t be much of a hardship to cook them over again…

During this time, I’ve also had a little fun playing around with my favourite choc-chip cookie recipe, adding various combinations of spices, cocoa, coffee and chocolate. This was much to the delight of my super-keen taste-testers who probably couldn’t taste a thing with their blocked noses, but loved the fact that we were experimenting all the same! A home economics, food appreciation and science lesson packed into one… Some batches were a little over the top in my enthusiasm for packing a punch of flavour, so when the following cookies came out of the oven, I was very relieved that the flavours I wanted were there, but with a touch more grace and subtlety.

Spiced-Up Chocolate Chip Cookies

  • Servings: Makes about 30 Cookies
  • Print

  • 100g Unsalted Butter
  • 150g/2/3 Cup Raw Sugar
  • 1 Free-Range Egg
  • 1 Teaspoon Vanilla Extract
  • 150g/1 Cup Plain Flour
  • ½ Teaspoon Baking Powder
  • 1 Teaspoon Chinese Five Spice
  • ½ Teaspoon Instant Coffee (crushed to a fine powder)
  • Pinch Salt
  • 100g Chopped Milk (or Dark) Chocolate

Pre-heat the oven to 180°C. Line 2 baking trays with parchment/baking paper.

Melt the butter in a small saucepan, over gentle heat. Once melted, remove from the heat and tip into a large mixing bowl, along with the sugar and mix well with a wooden spoon. Add the egg and vanilla extract and once again, mix well.  Sift in the flour, baking powder, Chinese Five Spice, coffee and salt and stir until combined. Add in the chopped chocolate and mix gently.

Onto the baking trays, scoop teaspoonfuls of the mixture, leaving a little space around each. Bake for about 10 minutes for a crispy texture, or a minute or two less if you prefer soft.

Remove to a cooling rack for at least a couple of minutes, before tasting…

Spiced Chocolate Chip Cookies Gather and Graze

Candid about Cumquat(s)

Perfect Cumquat | Gather and Graze

For a little while there, it was like having a third child… I gazed upon it, protected it, nurtured it and when it was fully grown and ready, I eased it out gently into the real world. Surely, there has been no other cumquat as well-loved and as well-photographed as this one here. You can more than likely tell that we don’t have many other fruit trees supplying us with nature’s bounty.

So, what did I end up doing with my one little cumquat? After requesting (and gratefully receiving… thanks girls!) advice on my previous post, thumbing through cookbooks and perusing numerous online images and recipes, a decision was finally made. Candied Cumquat was the unanimous consensus. A dear friend of mine mused that dark chocolate would be the perfect base… and as much as I knew that the flavours would work brilliantly together, I was unsure of the visual aspect in placing caramel-coloured candied cumquat atop the darkest of chocolate. I was picturing brown upon brown and felt that the cumquat might get a little lost. Lemon or orange syrup cake had entered my mind, but no amount of searching for attractive images online could confirm that this idea would create the beautiful result I was after. I searched and searched, but was surprisingly nonplussed by all that I came across.

In the end, flavour took priority and I decided on making some ‘Pots de Crème au Chocolat’ with a spot of cream to both highlight the cumquat and cut through the richness of the chocolate. I particularly thought to use a mixture of milk and dark chocolate in the Crèmes, to soften the flavour somewhat for my children’s palates… others may choose to work with purely dark.

I have a little confession to make though my friends… I have come to comprehend why our cumquat tree has hesitated in producing fruit for us before. It’s now really quite clear! Our family… all four of us it seems… DON’T actually like cumquats! Their appearance – yes! – by all means, what could be better than a fruiting ornamental cumquat to sit and admire? The candied cumquat that I made was all too reminiscent of the cloyingly tart marmalades I’ve tasted in the past. I ate it, but regret to say that it wasn’t altogether enjoyable. My youngest child passed his nibbled-at slice of cumquat to me, to finish on his behalf, while the others chewed furiously fast, just to make the taste go away… Thankfully the dessert sitting underneath was there and waiting. Within a moment the decadent taste of chocolate had wiped away the bitter ending to our prized cumquat.

This really wasn’t the outcome I’d hoped to be sharing with you today, but unfortunately it is the simple and honest truth. If we are graced by any more cumquats in the future, I will certainly try to find another way of enjoying them through cooking, in a savoury dish next time… like a tagine perhaps. Or maybe even amongst a salad…

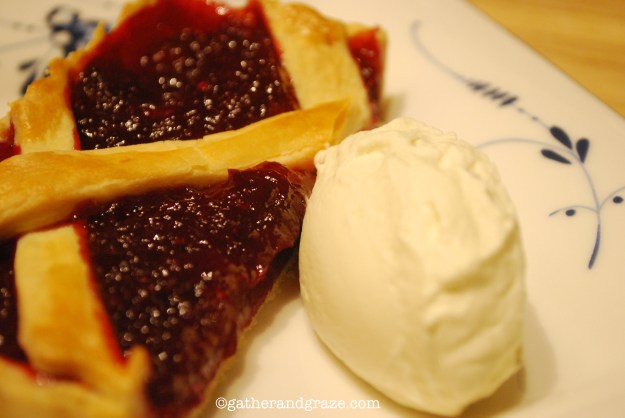
The Pots de Crème au Chocolat that I prepared are adapted slightly from a recipe I found, by The Plantation House Restaurant in Hawaii (which looks an idyllic location!). Being way too generous and enthusiastic in my portion sizes of these, I’ll know now for future reference, that this quantity will provide dessert for six to eight people, instead of a greedy four. They are lusciously creamy in texture, rich in chocolatey goodness and go beautifully with a scoop of chantilly cream on top. An adornment of fruit is still I think required, though depending on what’s in season, perhaps the likes of raspberries (or any berry for that matter), kiwi or banana. A sprinkling of chopped toasted nuts would also be fabulous…

Pots de Creme au Chocolat | Cumquat | Gather and Graze

Pots de Creme au Chocolat (with Candied Cumquat)

For the Pots de Crème:

  • 100g Dark Chocolate
  • 100g Milk Chocolate
  • 4 Tablespoons Raw Sugar
  • 375mls/1½ Cups Thick/Heavy Cream
  • 4 Free-Range Egg Yolks
  • 1 Teaspoon Vanilla Extract
  • Pinch of Salt

Gently melt the two types of chocolate over a double boiler. At the same time, warm up the cream in a saucepan, until it almost comes to a boil (do not let it boil). Add the sugar and heated cream to the chocolate, stirring carefully until smooth. Whisk the egg yolks in a separate bowl, then add a spoonful of the chocolate mixture and whisk to combine (this will hopefully help to avoid having scrambled eggs in the next stage!) Now add the egg yolks, vanilla extract and salt to the chocolate and again stir carefully until silky and smooth. If you feel at all that your mixture is a little lumpy, strain it through a sieve before it cools down.

Allow to cool a little before pouring into your chosen pots/glasses/ramekins. Refrigerate for about 3 hours, before serving with whipped (Chantilly) cream and a slice of candied cumquat.

For the Candied Cumquat: Cumquat | Gather and Graze

  • 2 – 3 Fresh Cumquats (if you happen to have that many…)
  • 125mls/½ Cup Water
  • 110g/½ Cup Sugar
  • 1 Star Anise (optional)

In a small saucepan, stir the water, sugar and star anise (if using) over medium heat until it comes to a gentle boil, allow the syrup to simmer for a minute or two. Slice the cumquats thinly and add them to the syrup. Simmer for about 10 minutes, stirring gently every now and then.

Candied Cumquat | Gather and Graze

Remove cumquat slices (and a little of the syrup) to a bowl to cool down, ready to garnish the Pots de Crèmes…

Pots Creme Chocolat Cumquat Gather and Graze

Vanilla Sundae Cupcakes and a Cumquat Quandary

Vanilla Sundae Cupcakes | Recipe | Gather and Graze

What to do… when your cumquat tree decides to bear just one, solitary cumquat? I wouldn’t be asking this question if it wasn’t the most beautiful cumquat I’d ever seen and as it’s the only cumquat my tree has ever deigned to produce, it truly deserves to be celebrated! My little citrus gem is ready to be plucked from it’s branch in the next day or two, before the birds discover my hidden treasure, so your thoughts and advice on how to best savour and venerate this lone piece of fruit would be ever so welcomed! I get the feeling jam is out of the question…

Cumquat Gather and Graze

From cumquats to cupcakes… Both, worthy of celebration and each so endearing in their miniature sizing. Though, unlike the cumquat, I’ve had a glut of cupcakes practically spilling out of the oven over the past few days as the Birthday celebrations of our eldest took place. Two dozen decorated cupcakes to share with classmates at school and then another dozen or so (slightly more dressed-up) for party day!

It was perfect timing that I’d done a ‘Cupcake Decorating’ course with a few girlfriends just recently, so unlike the many years gone by, I was now well-taught (though not terribly well-practised) in the techniques of frosting with a piping bag. It was so much speedier (and I must say, a little more elegant…) than slathering them with a palette knife! In our course, we also spent time decorating with fondant icing – forming piggy faces, roses, ribbons/bows and somewhat creepy-looking babies (well, mine was anyway!) A lesson of basic tips and tricks that will be fabulous to know for the family Birthday cakes yet to come. A few Photos…

There really is something indulgent and slightly magical in the eating of these miniature cakes, that can transport you back to childhood in an instant. Something decadent in being able to consume a whole cake, in it’s entirety, in a matter of seconds… without feeling too guilty. The flavours, colours and designs are limited only by your imagination.

Enjoy the following classic recipe for Vanilla Sundae Cupcakes with vanilla frosting, which are then made even more delicious with a topping of melted chocolate and a little crunch from coloured sprinkles. My children loved them… and I must admit, so did I!

Vanilla Sundae Cupcakes | Gather and Graze

  • Servings: Makes 12-15 Cupcakes
  • Print

  • 125g/½ Cup Unsalted Butter (softened)
  • 175g/¾ Cup (Raw) Caster Sugar
  • 2 Free-Range Eggs
  • ½ Teaspoon Vanilla Extract
  • 225g/1½ Cups Self-Raising Flour (Sifted)
  • Pinch of Salt
  • 125mls/½ Cup Full-Cream Milk

Pre-heat the oven to 180°C and place paper baking cups onto a tray.

In an electric mixer, cream the softened butter and sugar together until light and fluffy. Add the vanilla extract and the eggs, one at a time, beating well after each addition. Beat in the sifted flour and salt, in two lots, alternating with the milk until combined. Spoon the batter into the paper baking cups and bake for approximately 15 – 25 minutes (depending on the size of your cupcakes), or until a skewer comes out clean from the centre of your cupcakes.

Allow to cool completely before decorating. The recipe for frosting and tips for decorating are to follow…

Vanilla Sundae Cupcakes | Recipe | Gather and Graze

Vanilla Sundae Cupcakes | Recipe | Gather and Graze

Vanilla Butter Cream Frosting

  • 250g Unsalted Butter (Softened)
  • 500g Pure Icing Sugar
  • ½ Teaspoon Vanilla Extract
  • 2 Tablespoons Full-Cream Milk

Place all ingredients into an electric mixer and beat, initially on slow speed (until the icing sugar has been incorporated into the butter), then on medium/fast until frosting is fluffy.

Using a Wilton 1M Piping Tip (or similar) and a piping bag, pipe swirls over each of your cupcakes, working from the outside in.

Vanilla Sundae Cupcakes | Recipe | Gather and Graze

To transform into ‘Vanilla Sundae Cupcakes’… drizzle carefully with melted chocolate (I used 100g of good quality Milk Chocolate mixed with 1 Tablespoon of Vegetable Oil – heated gently and stirred over a double-boiler… or extra-carefully in short bursts in the microwave). Top each cupcake with a lolly/candy raspberry (or a glacé cherry for authenticity) and scatter with some coloured sprinkles.

Vanilla Sundae Cupcakes | Recipe | Gather and Graze

Greek-Style Butterflied Lamb with Yoghurt Dressing

Butterflied Lamb Yoghurt Dressing | Gather and Graze

A completely unexpected delight which has stemmed from creating this little blog has been opening up my ‘WordPress Reader’ each morning to discover what my newly-found blogging friends from around the world have been creating in their own kitchens.  Their musings, recipes and photos are at once delicious and provide more inspiration and encouragement than they can possibly imagine.  For this, I thank you all dearly!  You so frequently bring a smile to my face, illuminate light bulbs in my mind and bring calm to my heart in the knowledge that I’m not alone in this passion for all things food related.  It’s like discovering a family out there, that I never new I had! Continue reading

Gougères | Cheese Puffs

Gougeres Cheese Puffs Gather and Graze

For years I avoided any recipe that involved the making of choux pastry.  It always seemed like it had ‘catastrophe’ written all over it.  Eclairs and profiteroles were to be enjoyed fresh from authentic French patisseries… Continue reading

The last of summer’s offerings…

Tomato Basil Boursin Appetisers Gather and Graze

It was with something of a heavy heart that I went out to pick the last remaining tomatoes from the garden this morning.  They have provided us with such beautiful and bountiful fruit right the way through summer and autumn, however the time has finally come to clear the beds and tidy up before winter hits… and from the forecast I’ve just seen, it appears that winter will rear it’s frosty head tomorrow.  Give me a day or two and I promise that my melancholic mood will give way to much eagerness for all the delicious soups, roasts, casseroles and heart-warming puddings yet to come… however today shall be dedicated purely to the tomato.

Back in very late October I nestled our six little tomato seedlings into their rather large pots and commenced tending to them as if they were my own children.  Often questioning whether they were hungry or thirsty, getting enough warmth and light from the sun and making sure their ever-growing limbs were supported and nurtured in the right directions.  Our season hopefuls included two Romas, two Cherries, a Green Zebra and a Black Russian – an attractive mix of colours, sizes and flavours to adorn the salad bowls of summer.

The following simple idea for an appetiser brings together five of my all-time favourite ingredients, into one luxurious mouthful.  Perfect as they are, accompanied with an aperitif, or perhaps as part of an antipasto platter; I hope you’ll agree that the flavours intermingle superbly and leave you craving for more.

Appetiser - Summer Tomatoes | Gather and Graze

  • Servings: 16-20 Little Bites
  • Print

  • 8-10 vine-ripened Cherry Tomatoes (medium sized)
  • Boursin Cheese (80g will fill approx 16-20 halved tomatoes)
  • 16-20 Fresh Basil Leaves (small to medium sized)
  • Extra-Virgin Olive Oil
  • Balsamic Vinegar

DSC_0001

DSC_0004

Using a sharp knife, slice the cherry tomatoes in half and gently scoop out the seeds with a teaspoon.  Scoop a little Boursin onto the tomato halves and top with a basil leaf.  Drizzle lightly with olive oil and balsamic vinegar.

DSC_0005

DSC_0015

Notes:

  • Consider doubling the quantity… these are very moreish!
  • Use a good quality EV Olive Oil and if possible an aged Balsamic Vinegar – they really make a difference when used to dress a dish such as this one.
  • Perfect served with a chilled white wine on a sunny day.
  • I have categorised these under ‘Italian’, as although the cheese is decidedly French, I feel they ooze ‘italiano’ with their mix of tomato, basil, olive oil and balsamic…